From Idea to App - Set up authentication on the server

As our MVP (Minimum Viable Product) prototype of the task list app undergoes user testing, it’s time to build the backend infrastructure.
Introduction
Currently, the app operates solely on the client side, with all data stored in the user’s browser.
To enable usage of the app across multiple devices and potentially allow different users to access shared task lists, we need to move this data to the cloud.
With this change, all tasks from all users will be stored in a centralised database. This raises an essential question: how do we determine which tasks each user can access? This is where authentication comes into play.
Organisations
Since all tasks are stored in a single database, they need to be paired with users so that user A cannot see user B's tasks. However, enabling collaboration between users (e.g., user A and user B sharing tasks) would require significant rework.
By introducing a higher-level abstraction and associating both users and tasks with organisations, we decouple tasks from individual users, making it easier to let users share task lists in the future. The best part is that this change requires minimal effort - rather than linking entities directly to users, we simply associate them with organisations instead.
Authentication steps
Here's a high level overview of what we will implement:
Step 1: Creating User Accounts
Users will register using their email address. The email address serves multiple purposes:
- Unique identification – Ensuring no two users have the same login.
- Communication channel – Allowing us to send notifications, password resets, and verification emails.
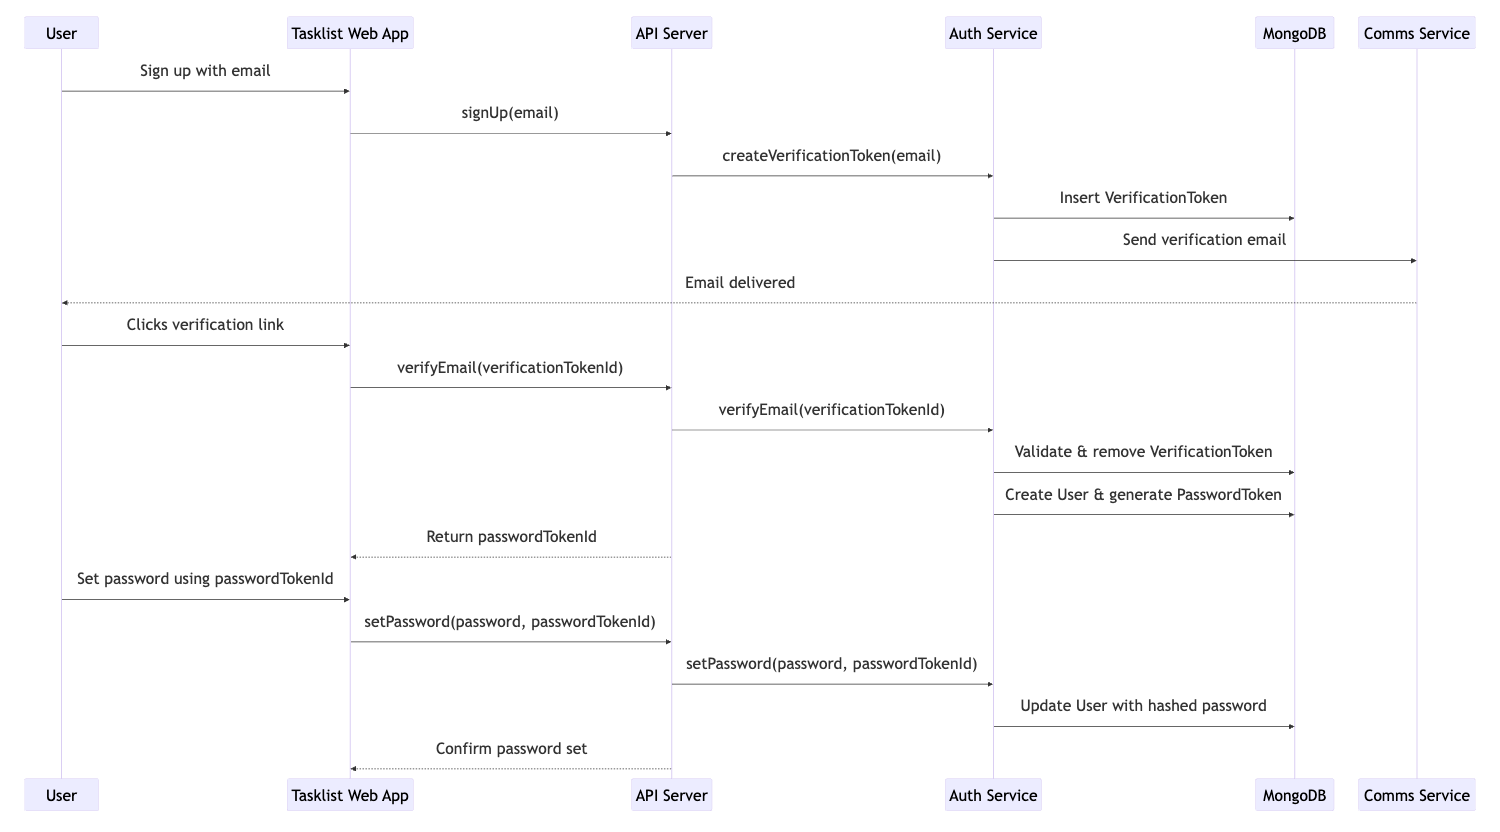
Step 2: Verifying the Email Address
To prevent unauthorised sign-ups, we must confirm that the email address truly belongs to the person registering. We achieve this with an email verification process:
- The user provides their email address during registration.
- We send an email containing a unique verification link.
- Clicking the link confirms their ownership of the email.
Sign up flow:
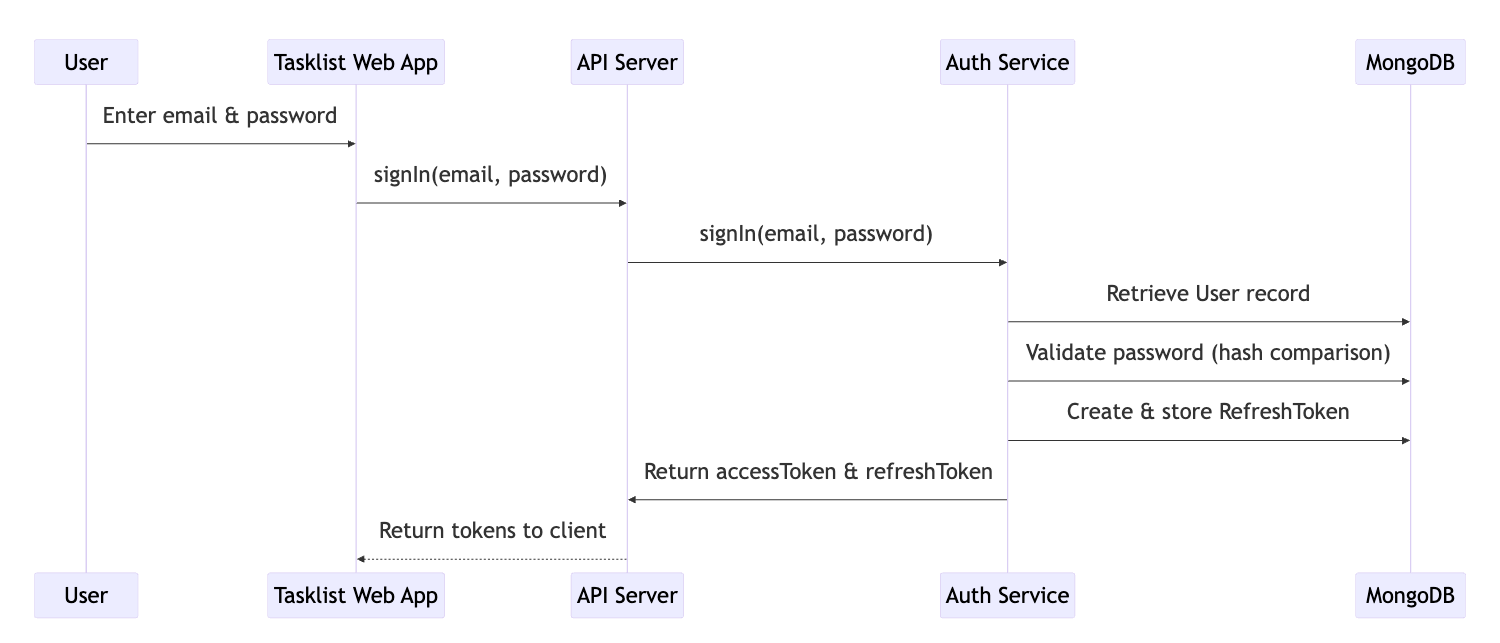
Step 3: Signing In & Authentication Tokens
After setting up their credentials, users can log in. However, authentication presents a challenge:
- The only moment we truly verify a user’s identity is when they sign in.
- We cannot ask users to re-enter their email and password for every request they make to the server.
- Instead, we use authentication tokens to maintain their session securely.
Sign in flow:
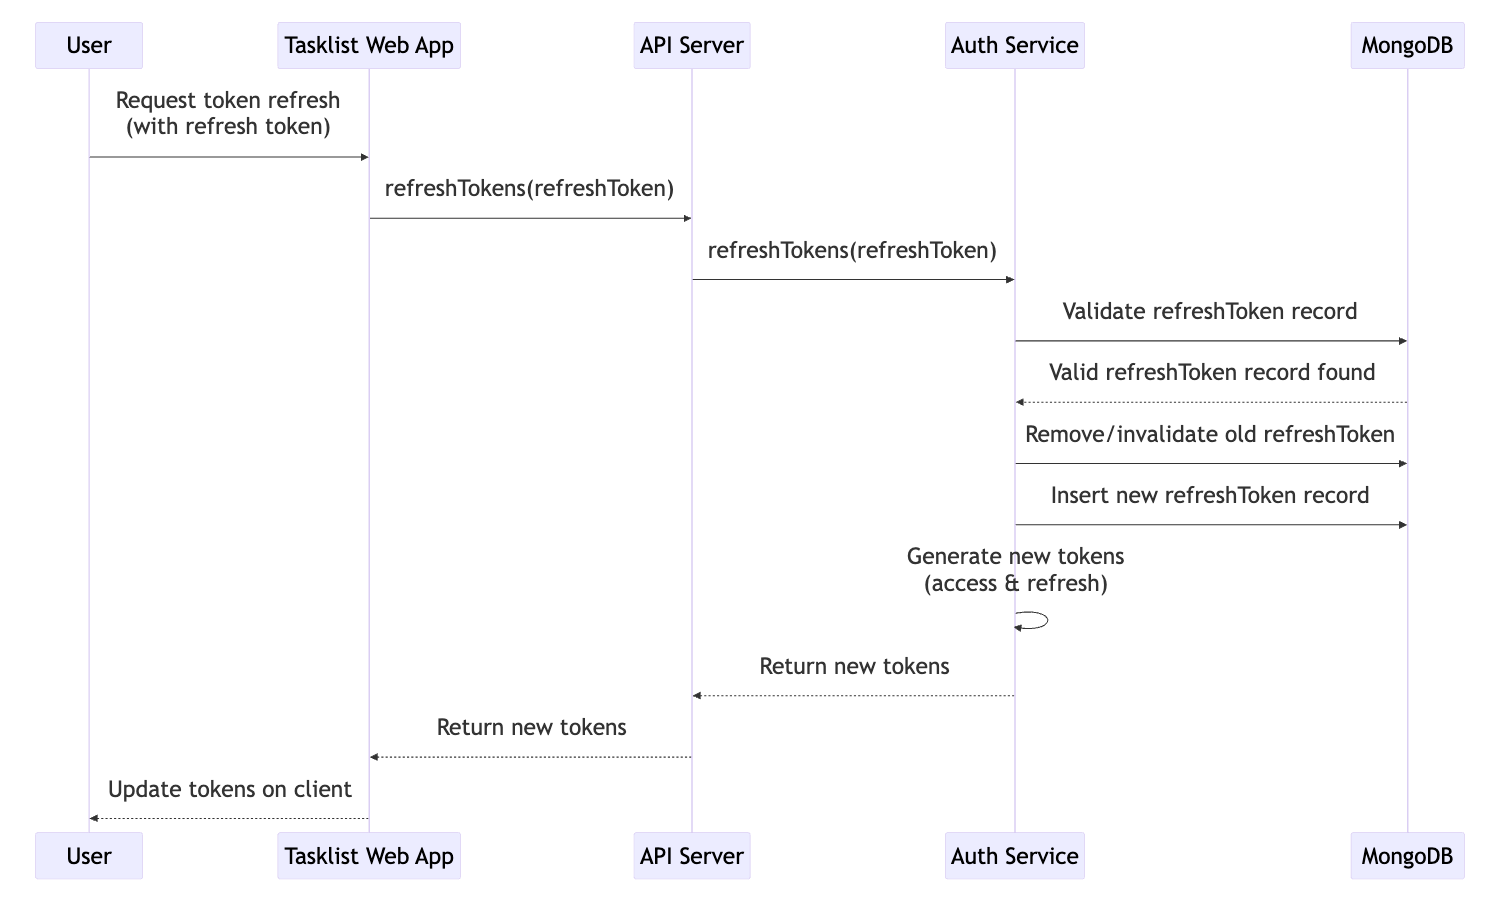
Token refresh flow:
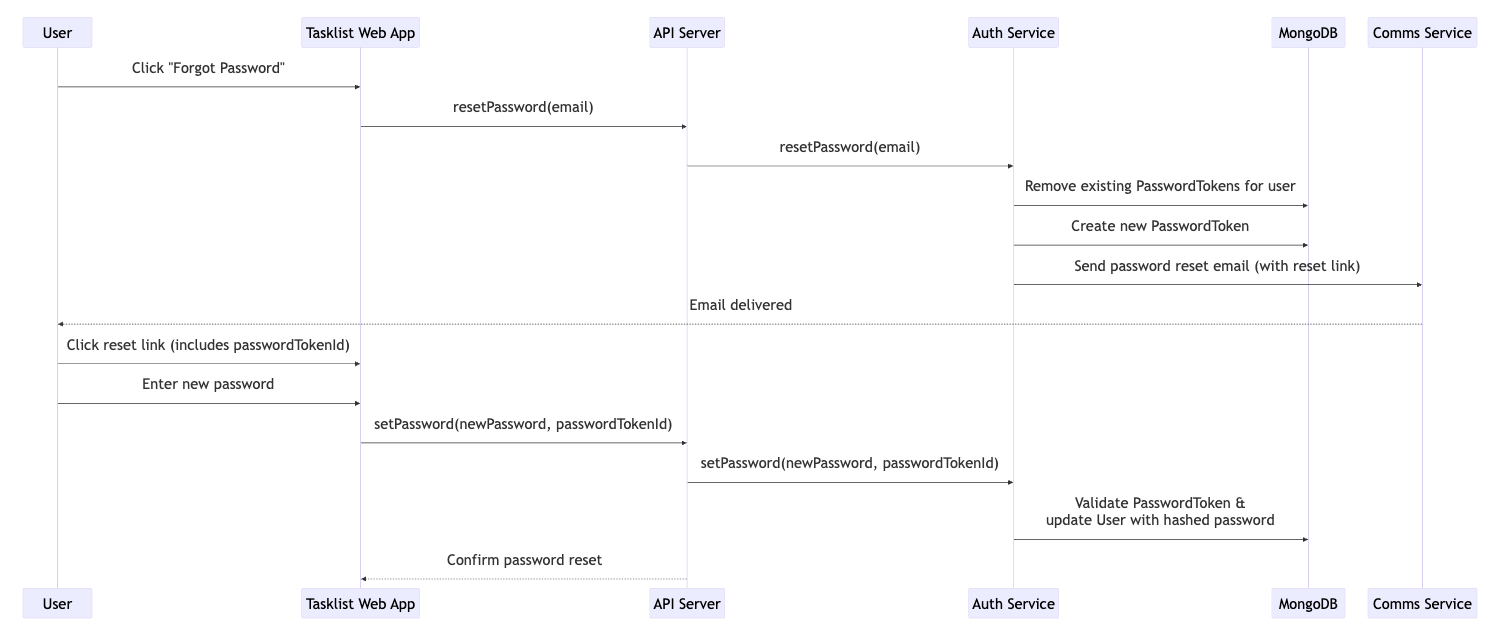
Step 4: Handling forgotten passwords
In case users forgot their password, we need to provide a secure way for them to regain access to their accounts.
- We give an option on the Sign in screen to Request a new password.
- On the Reset password screen, they submit their email address.
- We send them an email with a link containing a password token.
- Using the link they can set a new password which they can use to log in.
Password reset flow:
How Tokens Work
Upon successful login, we generate a pair of tokens:
- Access Token – This is sent with every request to the server. It contains information about the user and allows them to access resources.
- Refresh Token – This is stored securely (e.g., in an HTTP-only cookie) and is used to obtain a new access token when the previous one expires.
To prevent security risks:
- Access tokens expire quickly (typically within minutes) to minimise damage if compromised.
- Refresh tokens last longer but are stored securely and cannot be accessed by JavaScript in the browser, reducing the risk of theft.
- Refresh tokens are stored on the database too, so we can invalidate them externally without having to wait for them to expire.
Upcoming
We split the project into parts:
- Create comms service - for sending emails
- Create auth mongoose schemas - storing users, organisations, and tokens
- Create auth service - for handling authentication actions
- Create GraphQL API operations - to route user requests to the appropriate service
- Implement JWT authentication in the API - to wrap the above together
This is a high level diagram of what we are going to build:
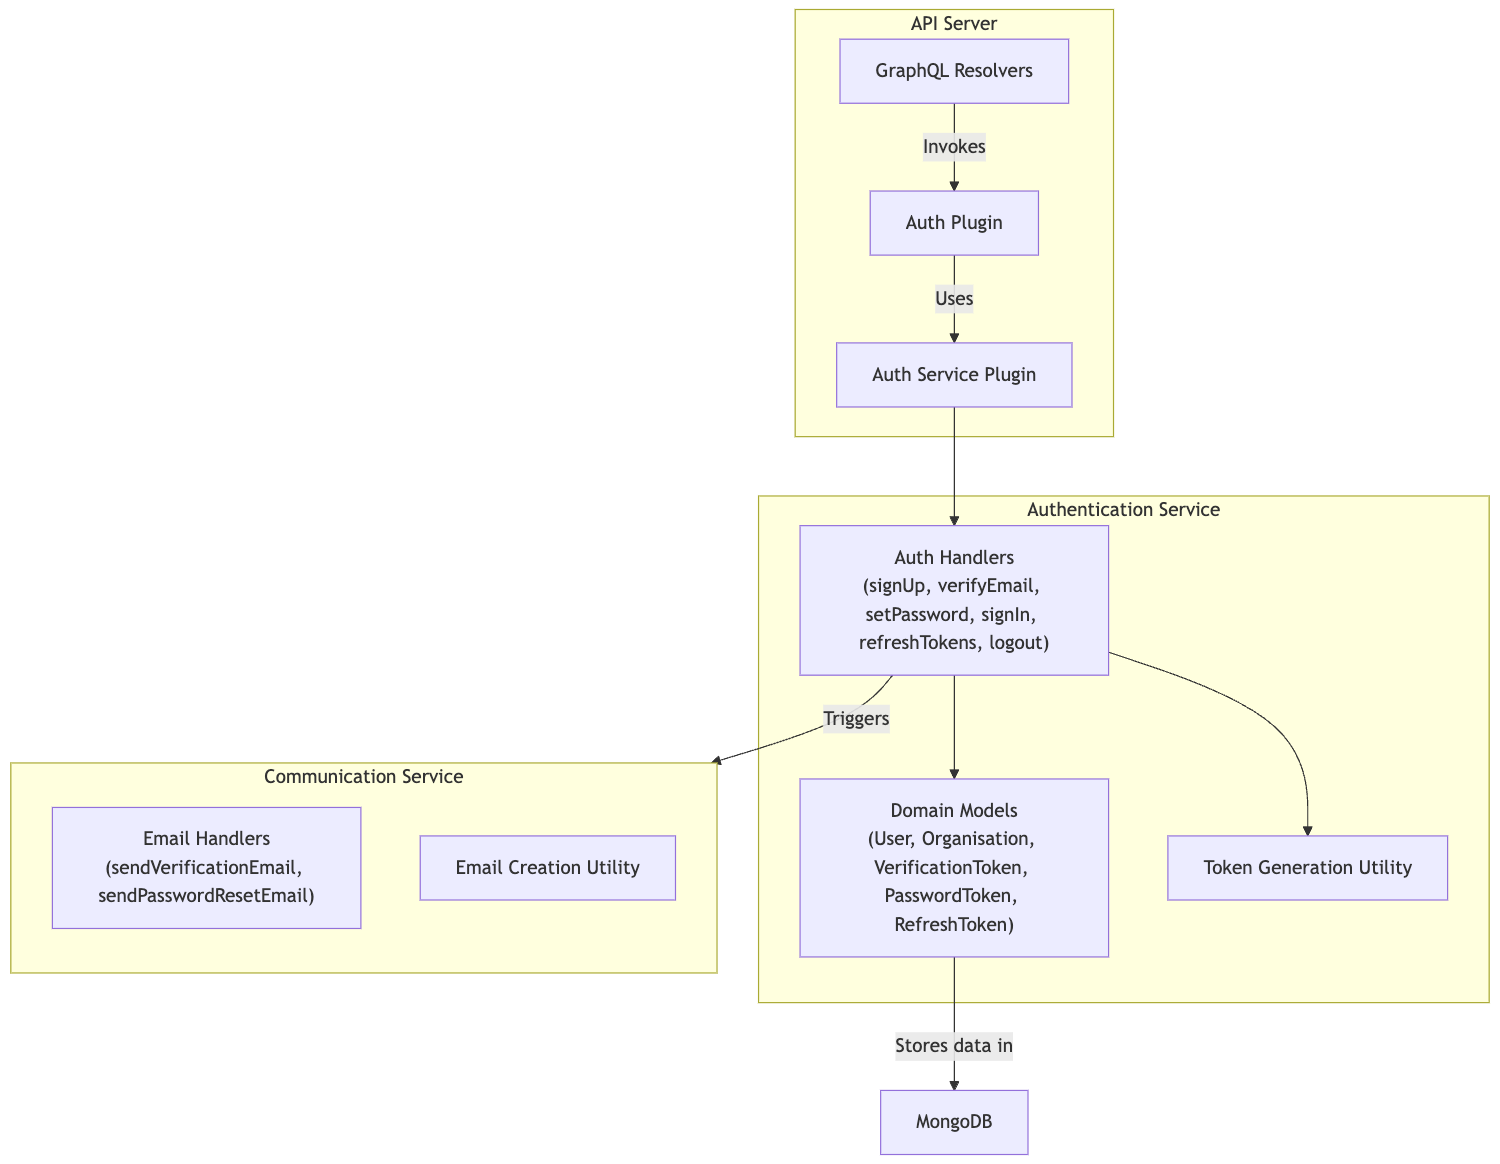
Services
We will create services, namely the comms service, and the auth service. They will be defined as packages for now to be used within the API, but designed in a way in which they can be easily extracted to their own HTTP microservices.
Architecture
- Config is passed down to the service factory. (e.g. database connection strings)
- Config is used to initialise resources for context. (e.g. database connections, models)
- The service factory returns an object where each service method is assigned to its corresponding handler factory function.
- Context is passed down to handler factory functions.
- Handler factories are curried functions that forward the context to the handlers via closure.
This may seem complicated at first, but it becomes much clearer and simpler when seen in practice.
Create comms service
We created a new package @repo/comms-service. The purpose of it will be to communicate with the users externally, outside of the app.
Email template
To make the process of constructing emails easier, we created a reusable email HTML template that takes care of formatting, and branding the emails. We have predefined some common elements in EmailElements like:
- button
- link
- h1
- h2
- text
This makes it easy to customise emails. The utility function createEmail receives the title, content, domain, and optional extra styles for the email.
Service factory
For now the purpose of the comms service is to send emails, and we will be using nodemailer and AWS SES to send emails in production. In development we will just log the props received by the handlers for easier debugging.
Handlers
Based on the authentication flow, we will need to send emails in two cases:
sendVerificationEmail- send the verification link with verification token to the user to verify email ownershipsendPasswordResetEmail- send the password reset link to verify email ownership, and set a new password with a password token
Both receiving the recipient’s email address and the url to include in the email.
Create auth mongoose schemas
For the authentication process we need to store information persistently on the database, and in order to do that, we need to create new database schemas, and validation schemas for:
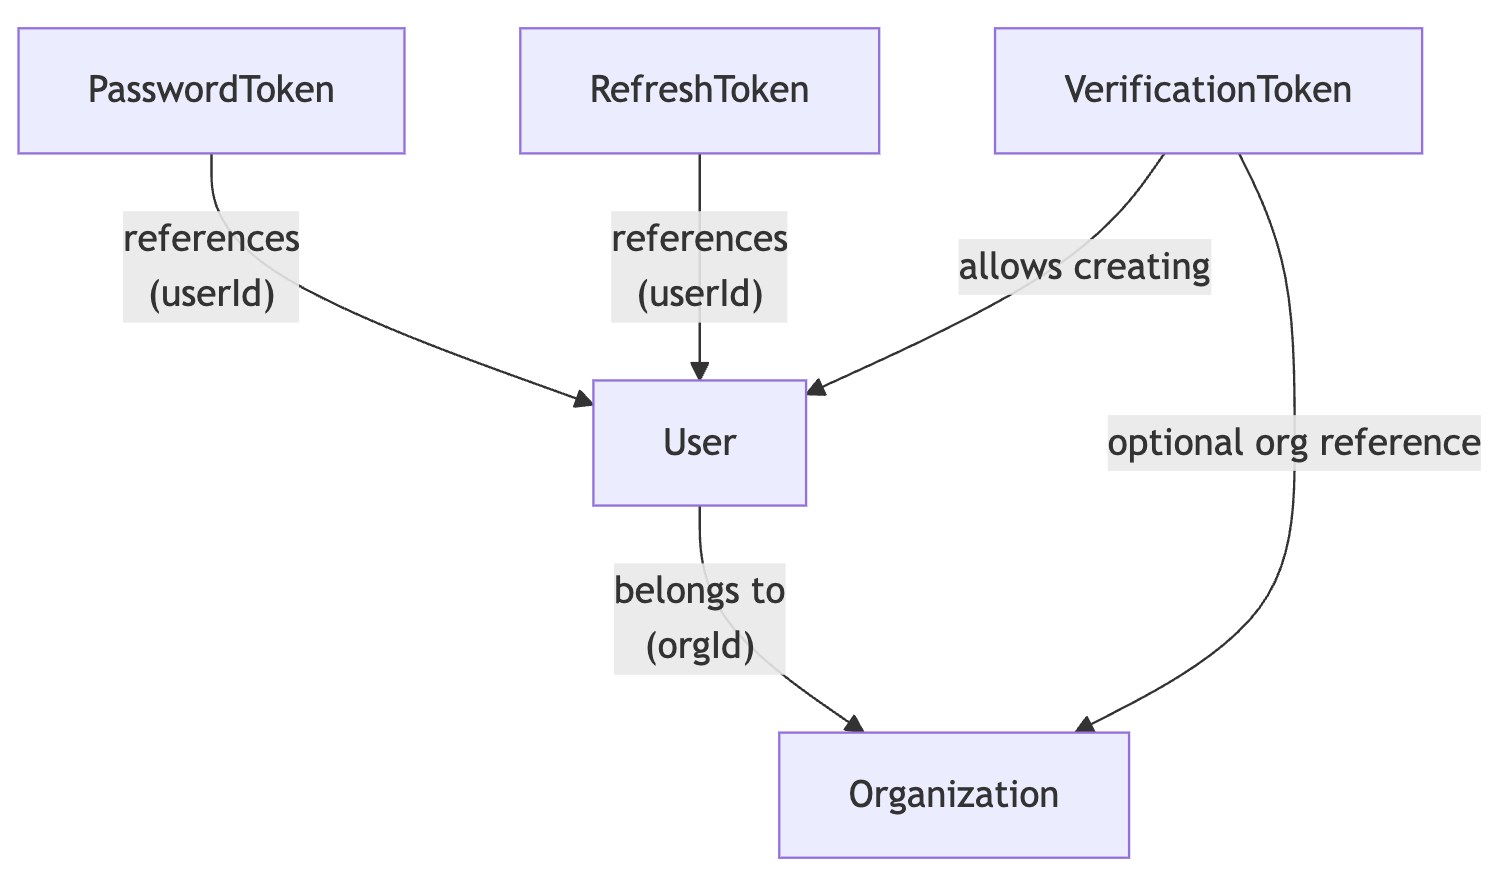
User- the user schema will store information required to identify users, and their properties like credentials, and which organisation they belong toOrganisation- the organisation groups together users, and tasks, so users belonging to an organisation can share tasksPasswordToken- belongs to a user, allows them to set a new passwordVerficiationToken- belongs to an email address, and binds it to a user when usedRefreshToken- storing refresh tokens on the server (along with the client) allows to remotely revoke and validate them
Here's a demonstration of the high level relations between the schemas:
Create auth service
The job of the auth service is to handle every authentication related operation, so that the API only needs to handle the routing of inputs and outputs.
Service factory
For the context of the handlers we will initialise resources:
- Database
connectionwith the connection string (DB_CONNECTION_STRING) coming from the config - An instance of the
commsServiceto be able to send emails - Relevant models of the database to be able to do CRUD operations on them:
OrganisationModelUserModelVerificationTokenModelPasswordTokenModelRefreshTokenModel
- A small utility function
generateTokensto generate access and refresh token pairs
Handlers
We defined the following handlers:
createVerificationToken- Generates a verification token for a new user based on their email, deletes any existing tokens for the email, and sends a verification email with a URL using thecomms-service'ssendVerificationEmail.verifyEmail- Validates the verification token to see if it exists and not expired, then creates an organisation if necessary, registers the user, and generates a password token.verifyPasswordToken- Checks if a given password reset token exists and is still valid (exists, and not expired).setPassword- Validates a password token, hashes and updates the user's password, marks them as verified, and deletes any existing refresh tokens.resetPassword- Generates a password token for a user, deletes any existing tokens, and sends a password reset email with a URL using thecomms-service'ssendPasswordResetEmail.signIn- Authenticates a user by validating their email and password, then generates and returns access and refresh tokens.refreshTokens- Validates and refreshes authentication tokens using a valid refresh token, deleting the old one and issuing new tokens.removeRefreshToken- Deletes a given refresh token if valid, ensuring the token cannot be reused.
Implement JWT authentication
While token generation and management are handled by the authentication service, we still need a way to securely issue, store, and forward tokens between the server and the client. This allows users to remain authenticated across requests while maintaining security best practices.
Authentication Plugins
To integrate authentication into the API, we have:
- Initialised the
authServiceas a plugin, making authentication methods available throughout the API. - Created an
authplugin that introduces several key methods for handling authentication tokens efficiently.
Reply Decorators
These are methods attached to Fastify’s reply object, allowing responses to manipulate authentication tokens:
setRefreshToken(refreshToken)- Stores the refresh token in an
httpOnlycookie for security.
- Stores the refresh token in an
refreshToken(refreshToken)- Calls
authService.refreshTokens()to generate new access and refresh tokens. - Stores the new refresh token in a cookie via
setRefreshToken().
- Calls
Request Decorators
These extend the request object, enabling authentication enforcement:
requireUser()- Ensures the user is authenticated.
- Throws an error if the user is not logged in.
Hooks
To automatically authenticate users when they send requests, we added a preHandler hook:
preHandlerHook- Extracts the access token from the
Authorizationheader. - Decodes the token and sets
request.userif valid.
- Extracts the access token from the
Create GraphQL API operations
Finally, we need to wrap everything together in GraphQL operations that are accessible by the client. We created the relevant mutations with their input shapes, and their corresponding resolvers:
signUpResolver- callsauthService.createVerificationTokento generate a verification token for the user and send a verification email.verifyEmailResolver- callsauthService.verifyEmailto verify a user's email using a verification token and returns a password reset token.setPasswordResolver- callsauthService.setPasswordto validate the password reset token and update the user's password.resetPasswordResolver- callsauthService.resetPasswordto generate a password reset token and send a password reset email.signInResolver- callsauthService.signInto authenticate the user using their email and password, issues authentication tokens, and sets the refresh token in cookies.refreshTokensResolver- callsresponse.refreshTokento refresh authentication tokens using a refresh token from cookies or request data, then returns them, and sets the refresh token in cookies.logoutResolver- callsauthService.removeRefreshTokento revoke the refresh token and clears the refresh token cookie.
Add verify password token method
Based on the ticket description, we need to add an additional method that checks if the password token is valid before it is used. Password tokens come into play when the user is resetting their password, and click on the link in the email.
- We created
verifyPasswordTokenArgsSchemafor the handlerverifyPasswordTokenin the auth service to validate its arguments using zod. We only need thepasswordTokenId. - We created the
verifyPasswordTokenhandler, which returnsfalseif the token doesn’t exist, or is expired, andtrueotherwise. - We created a new GraphQL operation
VerifyPasswordTokenthat takes thepasswordTokenIdas input - We created
verifyPasswordTokenResolverwhich is forwarding the input to the auth service, and returns its result.
Conclusion
With this release, we have implemented a complete user management system, including authentication, email verification, password recovery, and session management.
GitHub links
Next steps
We will continue to build our API, and implement task management including:
- Create Task database model
- Implement task-service
- Update GraphQL endpoints with task related operations
Here's how our timeline look like now: